As anyone who engages in geospatial analysis knows, studying a single location on a map can quickly turn into exploring places across the world. The limiting factor for such analyses is the quality of the dataset, including the scope, number of locations, and much more. Foursquare’s Places API is up to such a task, providing a selection from 100M+ POIs that reveal insight about the world around us.
Creating an immersive map experience within an application can help users easily discover their surroundings. In this tutorial, we’ll demonstrate how to enhance a native iOS app with a map using the Mapbox SDK and the Foursquare Places API. By leveraging the device’s location, we’ll be able to search for and annotate nearby points of interest on the map.
Annotating a MapBoxMapView using Foursquare Place Search API
Adding a Mapbox Map to SwiftUI
A Mapbox API account and access token is required to insert maps into an application. If you do not have a Mapbox account, sign up here
Once you have a Mapbox account, follow the installation instructions for generating access tokens and installing a Mapbox Map on iOS here.
Integrating Mapbox and Places API
Now, let’s integrate Mapbox with the Foursquare Places API. First, jump over to the Foursquare Developer Console and generate an API key for a new project. Be sure to save the key in a safe place – it won’t be accessible again in the console.
Now, we will set up the Mapbox Map by creating a MapBoxViewController Swift class in our project. To keep things organized, we will also create the class MapBoxView to contain functions that control the map. We create the MapView object inside the controller class and override the viewDidLoad function with some initialization boilerplate code. The CameraLocationConsumer lets us control the view of the map and the PointAnnotationManager allows us to put markers on the MapView object.
MapBoxViewController.swift class to manage MapboxMapView
final class MapBoxMapViewController: UIViewController, AnnotationViewDelegate, LocationPermissionsDelegate, AnnotationInteractionDelegate {
internal var mapView: MapView!
private var cameraLocationConsumer: CameraLocationConsumer!
private var pointAnnotationManager: PointAnnotationManager!
override public func viewDidLoad() {
super.viewDidLoad()
mapView = MapView(frame: view.bounds)
mapView.autoresizingMask = [.flexibleWidth, .flexibleHeight]
cameraLocationConsumer = CameraLocationConsumer(mapView: mapView)
mapView.mapboxMap.onNext(event: .mapLoaded) { [weak self] _ in
guard let self = self else { return }
// Register the location consumer with the map
// Note that the location manager holds weak references to consumers, which should be retained
self.mapView.location.addLocationConsumer(newConsumer: self.cameraLocationConsumer)
}
pointAnnotationManager = mapView.annotations.makePointAnnotationManager()
pointAnnotationManager.delegate = self
mapView.location.options.puckType = .puck2D(Puck2DConfiguration.makeDefault(showBearing: true))
mapView.location.delegate = self
self.view.addSubview(mapView)
let followPuckViewportState = mapView.viewport.makeFollowPuckViewportState(options:
FollowPuckViewportStateOptions())
mapView.viewport.transition(to: followPuckViewportState,
transition: mapView.viewport.makeImmediateViewportTransition())
prepareStyle()
}
MapBoxView.swift class to hold logic for managing map
struct MapBoxMapView: UIViewControllerRepresentable {
    @Binding var places: [Place]

    func makeUIViewController(context: Context) -> MapBoxMapViewController {
        return MapBoxMapViewController()
    }

    func updateUIViewController(_ uiViewController: MapBoxMapViewController, context: Context) {
        //Map update code goes here

    }
}
Next, we will add the MapboxMapView to the ContentView, which will show the map when our SwiftUI application is started. We will use a ZStack to add a search form that supports the user who is searching and also passes the search query to the API.
ContentView.swift class to display MapViewMap and search bar
struct ContentView: View {
    @ObservedObject private var locationManager = LocationManager()
    @State private var search = ""
    @State private var places = [Place]()
    @State private var showLocationError = false
    @State private var showApiError = false


    var body: some View {
        MapBoxMapView(places: $places)
        ZStack(alignment: .bottom) {
            TextField(NSLocalizedString("Search", comment: ""), text: $search) {
                Task { await search() }
            }
            .textFieldStyle(RoundedBorderTextFieldStyle())
            .padding()
            .offset(y: 0)
            .alert("Unable to get location", isPresented: $showLocationError) {
                Button("OK", role: .cancel) { }
            }
        }
    }
}


struct ContentView_Previews: PreviewProvider {
    static var previews: some View {
        ContentView()
    }
}
Run the application and you should see the Mapbox Map appear with a search bar at the bottom of the screen. Now that we have the UI component set up, we just need to connect search to the Places API call and add the annotations to the mapview.

User’s location displayed as blue puck on Mapbox Map
Integrating the Place Search API
Next, let’s build a class to retrieve POIs from the Place Search API using the user’s query input and current location. Create a new Swift file called Api.swift to contain the following code to call the Place Search endpoint. Be sure to replace ‘[YOUR_API_KEY]’ with an API generated for the Foursquare Developer Console. We are adding a public function that accepts a query and location. This function should be async and return an array of Places.
Api.swift class to call Foursquare Places API
final class Api {
    enum Error: Swift.Error {
        case httpError(statusCode: Int)
        case serializationError
    }


    private init() { }


    class func getPlaces(query: String, location: CLLocation) async throws -> [Place] {
        let url = {
            var comps = URLComponents(string: "https://api.foursquare.com/v3/places/search")!
            comps.queryItems = [
                URLQueryItem(name: "query", value: query.self),
                URLQueryItem(name: "ll", value: "\(location.coordinate.latitude),\(location.coordinate.longitude)"),
                URLQueryItem(name: "limit", value: "15")
            ]
            comps.percentEncodedQuery = comps.percentEncodedQuery?.replacingOccurrences(of: "+", with: "%2B")
            return comps.url!
        }()
        let request = {
            var request = URLRequest(url: url)
            request.httpMethod = "GET"
            request.allHTTPHeaderFields = [
                "accept": "application/json",
                "Authorization" : "[YOUR_API_KEY]"
            ]
            return request
        }()
        let (data, response) = try await URLSession.shared.data(for: request)
        let statusCode = (response as? HTTPURLResponse)!.statusCode
        if (statusCode != 200) {
            throw Error.httpError(statusCode: statusCode)
        }
        guard let response = try? JSONDecoder().decode(PlacesResponse.self, from: data) else {
            throw Error.serializationError
        }
        return response.results
    }
}
Build your application again to confirm that it builds successfully. If the build is successful, return to the ContentView file to integrate the Places search with the search text box. To do so, we must take the input of the search box, then pass it to the API search function. In this section, we will add a method to conduct the search in the ContentView. The locationManager is an @ObservedObject, which publishes the user’s location, and is passed as a parameter to the getPlaces method.
ContentView.sift file
@State private var places = [Place]()

private func search() async {
        do {
            guard let location = locationManager.location else {
                showLocationError = true
                return
            }
            places = try await Api.getPlaces(query: search, location: location)
        } catch {
            print(error)
        }
    }
Placing the Annotations
The MapboxMapView class binds to the places array via the @State property wrapper. In our MapboxMapView class, we will use the functions from the MapBoxMapViewController class to update the map with our Place Search results.
MapBoxMapView.swift class updated to modify the map after the user’s query
func updateUIViewController(_ uiViewController: MapBoxMapViewController, context: Context) {
        //remove previous annotations
        uiViewController.removeAllAnnotations()

       var closest: Place?
        var closestDistance: Int = 0

        //Add new annotations
       for place in places {
            guard let main = place.geocodes["main"] else {
                continue
            }
            uiViewController.addPointAndViewAnnotation(at CLLocationCoordinate2D(latitude: main.latitude, longitude: main.longitude), title: place.name)

            if (place.distance < closestDistance || closestDistance == 0) {
                closest = place
                closestDistance = place.distance
            }
        }


        guard let closest = closest,
            let latitude = closest.geocodes["main"]?.latitude,
            let longitude = closest.geocodes["main"]?.longitude else {
            return
        }
        let centerCoodinate = CLLocationCoordinate2D(latitude: latitude, longitude: longitude)
        uiViewController.updateCameraView(center: centerCoodinate)
    }
We use a few methods from the MapboxMapViewController class to take actions on the map.
- Remove any previous annotations.
func removeAllAnnotations(){
        mapView.viewAnnotations.removeAll()
        pointAnnotationManager.annotations.removeAll()
    }
- Add the new markers and annotations with the title of each POI.
public func addPointAndViewAnnotation(at coordinate: CLLocationCoordinate2D, title: String) {
        addPointAnnotation(at: coordinate)
        addViewAnnotation(at: coordinate, title: title)
    }


    private func addPointAnnotation(at coordinate: CLLocationCoordinate2D) {
        var pointAnnotation = PointAnnotation(id: Constants.markerId, coordinate: coordinate)
        pointAnnotation.iconImage = Constants.RED_ICON_ID
        pointAnnotation.iconAnchor = .bottom

        pointAnnotationManager.annotations.append(pointAnnotation)
    }

    private func addViewAnnotation(at coordinate: CLLocationCoordinate2D, title: String) {
        let options = ViewAnnotationOptions(
            geometry: Point(coordinate),
            width: 128,
            height: 64,
            associatedFeatureId: Constants.markerId,
            allowOverlap: false,
            anchor: .bottom,
            offsetY: markerHeight
        )
        let annotationView = AnnotationView(frame: CGRect(x: 0, y: 0, width: 128, height: 64))
        annotationView.title = title
        annotationView.delegate = self
        try? mapView.viewAnnotations.add(annotationView, options: options)
    }
- Update the camera view to move toward the closest POI.
public func updateCameraView(center: CLLocationCoordinate2D){

        let camOptions = CameraOptions(center: center)
        mapView.camera.ease(to: camOptions, duration: 3)
       }
Try running your application again and testing the search functionality. If everything is set up correctly, upon searching in your application, it should look like the image below.
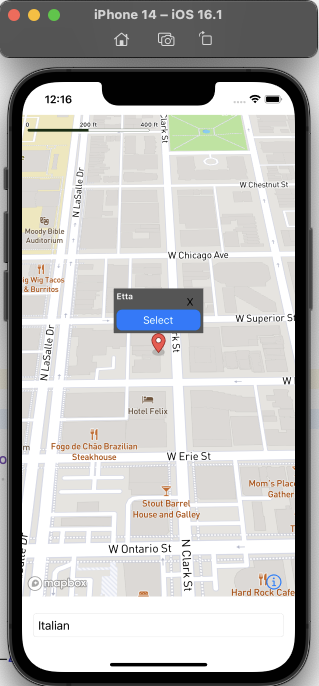
Screen after successful location search
You are done! This example only uses Place Search, but other Foursquare offerings can be integrated with a Mapbox Map as well, such as Autocomplete or Address Details. Mapbox also has many examples and documentation for their SDK’s use cases.
Check out this sample code as well as others in our examples Github repository.
Hopefully this gets you started on the journey to building a location-aware app! If you have any questions or feedback, join our Discord Developer Community to engage with other engineers using Foursquare products.